Should Trailer Safety Chains Be Crossed? Why the X Pattern Matters
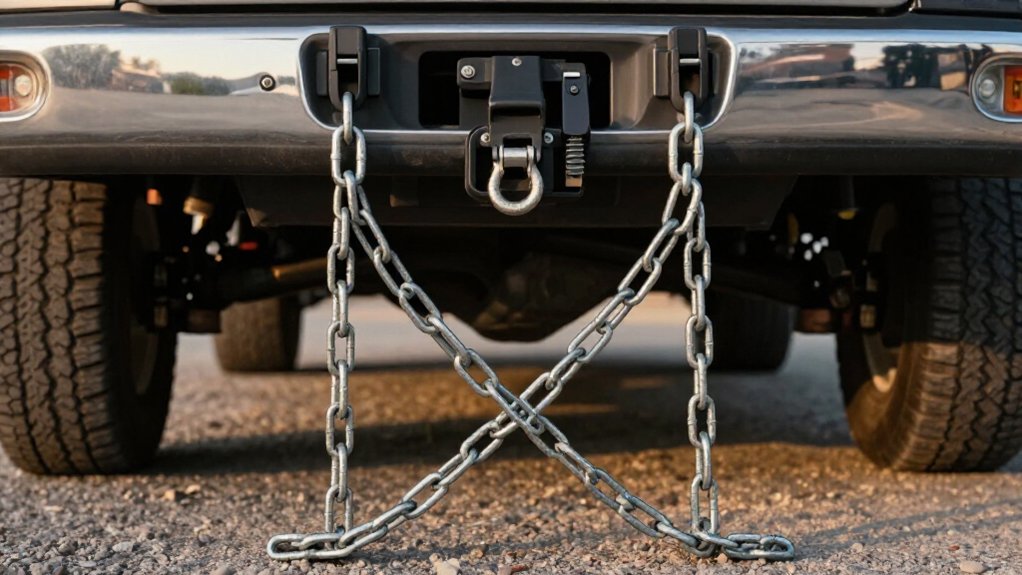
When your trailer uses a ball coupler, cross its safety chains beneath the coupler to form an X-shaped cradle. If the coupler separates, the chains can support the tongue and help keep it from dropping onto the road.
Check your local towing rules and trailer and hitch manufacturers’ instructions, since requirements and setups vary.
Leave enough slack for turns, but keep chains off the ground.
Confirm both chains and attachment points are secure.
More setup checks can help you tow safely.
X-Pattern Requirement Limits
Crossing trailer safety chains under the coupler creates a cradle that can catch the tongue if the coupler fails and help keep it off the road.
Requirements vary by location, so check your state’s towing rules and the trailer or hitch manufacturer’s instructions before you connect. Some jurisdictions, including North Carolina, may require crossed chains; don’t assume this practice is optional everywhere. Route each chain from one side of the trailer to the opposite tow-vehicle attachment point, crossing beneath the coupler.
Keep enough slack for turns and suspension movement, but don’t let chains hang low enough to contact the road. Chains that are too tight can restrict turning, while poor routing can undermine support if separation occurs. Before departure, verify the crossed layout is secure and inspect hooks, attachment points, and chain condition.
Why Crossed Chains Catch a Dropped Tongue
That X-shaped cradle gives the tongue a place to land if the coupler separates, helping keep it from dropping to the road and allowing the trailer to detach completely.
When you cross the chains beneath the coupler, their intersection sits under the tongue, ready to bear its weight if the connection fails. This support can keep the trailer attached to your tow vehicle instead of letting the tongue fall and leaving the chains ineffective.
Set the chains so their lowest point stays about 4–6 inches above the ground when connected. That clearance gives the cradle room to catch the tongue without dragging. Check slack before travel: leave enough for full turns, but not so much that the tongue can drop too far before the chains take its load. Inspect the hooks and attachment points, too; a cradle only works if both chains remain securely connected and can support the load under expected towing loads.
How Crossed Chains Guide a Dropped Tongue
If the coupler separates, crossed chains guide the tongue downward until the X beneath it supports the load, limiting its drop and helping keep it from digging into the road.
That cradle doesn’t stop the failure, but it can keep the trailer attached and prevent an uncontrolled fall. As you inspect the setup, confirm both chains connect securely and cross beneath the coupler; straight routing won’t create the same support. Follow your vehicle, trailer, and local requirements, since applicable rules may specify crossed routing.
| Stage | What happens | Safety purpose |
|---|---|---|
| Separation | Coupler releases | Failure begins |
| Crossover | X supports tongue | Limits ground contact |
Once the crossover bears the tongue, it limits contact and reduces the chance it digs in. Treat chains as emergency support, not a substitute for a secured coupler or sound hitch.
Chain Length and Slack
Set the crossed chains with about 6–12 inches of slack in a straight-ahead position, while keeping the lowest point 4–6 inches above the ground. Check that they stay clear of the road and don’t drag as you maneuver.
Turn lock-to-lock to confirm the chains won’t pull tight.
Ideal Slack Range
Aim for about 6–12 inches of slack with the tow vehicle and trailer straight, enough for full lock-to-lock turns without the crossed chains binding or pulling tight. Check the fit with the rig on level ground, then turn the steering wheel in both directions while watching the chains. They should remain loose enough to move freely, but not so loose that they hang excessively.
Your vehicle’s chain-loop spacing affects the amount you need: wider spacing generally calls for more slack to accommodate tight turns. If you’re sizing chains, you can back the trailer into a near-jackknife position and measure the rope needed between attachment points. Choose the next available chain length up, rather than risking a tight fit.
Recheck the crossed cradle after connecting, and confirm that neither chain pulls taut through the turning range. A fit preserves movement while keeping the chains ready to support the coupler if the trailer separates.
Preventing Excess Chain Drag
To prevent road drag, cross the chains in an X beneath the coupler and keep the lowest point roughly 4–6 inches above the ground while preserving enough slack for full lock-to-lock turns. Set chain length so crossed chains can cradle the tongue if the coupler separates. With chains straight, about 6–12 inches of slack is a common target; confirm clearance on level ground.
| Check | Action |
|---|---|
| Drag marks | Shorten chain |
| Length setup | Measure near-jackknife |
Use rope between vehicle attachment points and trailer mounts, then round up to the nearest available chain length. If parking-lot turns leave scraping, shorten the chains or reposition their brackets; don’t add slack. Recheck crossed-chain clearance before towing, and replace damaged links. Inspect hooks and mounts for secure, manufacturer-approved attachment points before towing.
Allowing Safe Turning Movement
After checking that the crossed chains won’t drag, allow enough slack for the trailer to turn fully without pulling the chains or stressing their hardware.
When your truck and trailer sit straight, aim for about 6–12 inches of slack. This gives the trailer room to turn lock to lock while keeping the chain cradle roughly 4–6 inches above the ground.
That height helps the crossed chains catch a separated tongue without digging in.
To size chains accurately, use a near-jackknife setup. Measure rope from the trailer’s chain attachment points to the tow vehicle’s loops, then round up to the nearest available chain length. Check turning clearance before towing. If chains drag in tight turns, adjust routing or attachment points, or shorten the chains safely.
Coupler and Hitch Configuration
Check your coupler type and hitch design, since ball-style connections generally require two safety chains crossed beneath the coupler.
Attach each chain to a designated trailer-frame tow point, not a bumper or other non-structural part. Confirm the crossed chains clear the ground and allow full turns without binding or becoming taut.
Coupler Type and Design
Because the coupler determines how the trailer tongue can move if the connection fails, match the crossed-chain cradle to its design. For a bumper-pull ball connection, route chains in an X beneath the coupler; federal rules require this arrangement to help keep a failed tongue from dropping to the road. Under 49 CFR 393.70, this applies to covered connections.
Many standard gooseneck and fifth-wheel hitches provide a secure coupling without traditional chains. If you add an adapter that changes the setup to a ball-and-coupler connection, use properly rated chains and cross them beneath that coupler. Check that combined chain capacity exceeds trailer GVWR, and don’t overlook hooks or connectors: undersized hardware can fail first. Set slack so chains allow full lock-to-lock turns without tightening dangerously or dragging, for safe turning and ground clearance.
Hitch Attachment Points
Attach each safety chain to a structural trailer-frame point or designated tow point, not the bumper or another nonstructural part, and use hitch-side attachment points rated for the load. When a coupler connects to a ball, federal rules require safety chains; route them in an X beneath the coupler so they can cradle the tongue if separation occurs.
Match chain and hardware working load limits so their combined strength exceeds your trailer’s GVWR. Grade matters: Grade 30 is weaker than Grade 43, while Grade 70 is stronger. Choose a chain arrangement suited to your hitch: bumper-pull trailers need crossed chains, while gooseneck or fifth-wheel setups may still require chains or cables in some states. Seat and orient each hook securely; an unlatched S-hook can undermine a chain.
Clearance and Compatibility
As you route crossed chains beneath the coupler, make sure they fit your hitch configuration and can cradle the tongue without restricting movement.
Check slack for full lock-to-lock turns; straight chains often need roughly 6–12 inches, yet mustn’t drag when the coupler articulates.
| Check | Your target |
|---|---|
| Attachment | Frame-mounted, not bumper |
| Clearance | About 4–6 inches |
Choose hooks and connectors whose working load limit matches your trailer’s GVWR.
After connecting, inspect the cradle and turn fully left and right; verify chains stay clear of tires, ground, and hitch parts while maintaining slack.
A coupler-to-ball setup, including one with adapters, requires correctly rated crossed chains. Some gooseneck and fifth-wheel couplings may not use traditional chains, so check your exact equipment and local rules. If movement pulls a chain taut or lets it scrape, reposition or use compatible hardware.
Uneven-Load Maneuvering
During uneven-load turns, a crossed X-pattern helps distribute chain tension and cradle the tongue if the coupler separates, reducing the chance that it drops or swings down. You’ll see one chain tighten first as the trailer turns and weight moves laterally. Crossing positions both chains to catch the coupler near ground level if separation occurs, limiting how far the tongue can fall or swing.
Keep the chains evenly routed and inspect their attachment points; if one chain carries nearly all the load during a turn, check for incorrect routing or slack. Too little slack can bind or overstress a chain at full steering lock, while excess slack can drag and compromise the cradle. Verify the chains’ combined capacity exceeds your trailer’s GVWR.
In a safe parking lot, test full lock-to-lock turns with cargo secured and confirm the chains neither bind nor drag. Recheck after any load change before travel again.
Pintle Hitch Compatibility
Even with a pintle hitch, you need at least two safety chains to serve as a backup if the coupler separates.
The X pattern beneath the coupler forms a cradle, helping catch the tongue before it drops and digs into the ground. Hard braking or bumps can shift pintle-to-ball or coupler-to-tow connections, so crossed chains can help prevent complete separation.
Use rated hardware: combined chain strength must exceed your trailer’s GVWR. Set enough slack for full turns, but keep chains from dragging. If adapters convert your setup to a bumper-pull connection, route chains to cradle the coupler; don’t assume a secure-feeling hitch removes that need. Inspect every connection before towing.
| Check | Practical requirement |
|---|---|
| Count | At least two chains |
| Strength | Combined rating above GVWR |
| Slack | Turns freely; no dragging |
Mistakenly Crossing Only One Chain
If you cross only one safety chain, the setup won’t form the X-shaped cradle needed to support the coupler evenly if it separates.
- The crossed chain may catch one side, but the uncrossed chain hangs straight, leaving the opposite side poorly supported.
- That tether can let the tongue shift or drop, increasing the chance it hits pavement and digs in.
- Federal rules rely on two chains positioned to catch the coupler; a one-sided crossing can’t provide that balanced cradle.
- Inspectors flag incorrect routing; in 2025, chain violations represented 23% of trailer citations and preceded 72% of out-of-service orders.
If either chain won’t reach, fit properly rated chain length and hardware; don’t improvise. Ensure combined chain capacity exceeds your trailer’s GVWR before towing safely.
Check Hitch Manufacturer Guidance
Check your hitch and trailer manuals before routing the chains, since some designs require an X beneath the coupler to help support the tongue if the coupler fails. Then follow the manual’s slack guidance. Allow enough chain length for full lock-to-lock turns, but keep the chains from dragging. The X can cradle a dropped tongue only if its low point stays above the ground.
Use only approved frame-mounted tow points or chain loops; don’t clip chains to a bumper or other nonstructural hardware. Crossing them won’t help if the attachment pulls free. Check that your chains and connectors meet the required working load limit (WLL). Your system’s capacity is limited by its weakest component.
If your manual lists an exception for a gooseneck or fifth-wheel setup, treat it as conditional. Confirm whether your configuration still has a coupler-to-ball connection and requires chains or cables. When instructions conflict, contact manufacturer before towing.
Conclusion
Cross your trailer safety chains beneath the coupler when your hitch and local rules allow it. This X can help catch a dropped tongue and keep it from digging into pavement, but it cannot replace a sound coupler, proper chain ratings, or careful setup.
Leave enough slack for turns without letting chains drag. Confirm the arrangement with your hitch manufacturer, especially with pintle or unusual setups. Before each trip, inspect connections and secure every latch.