How to Install a Fifth Wheel Hitch: Rails vs OEM Puck System
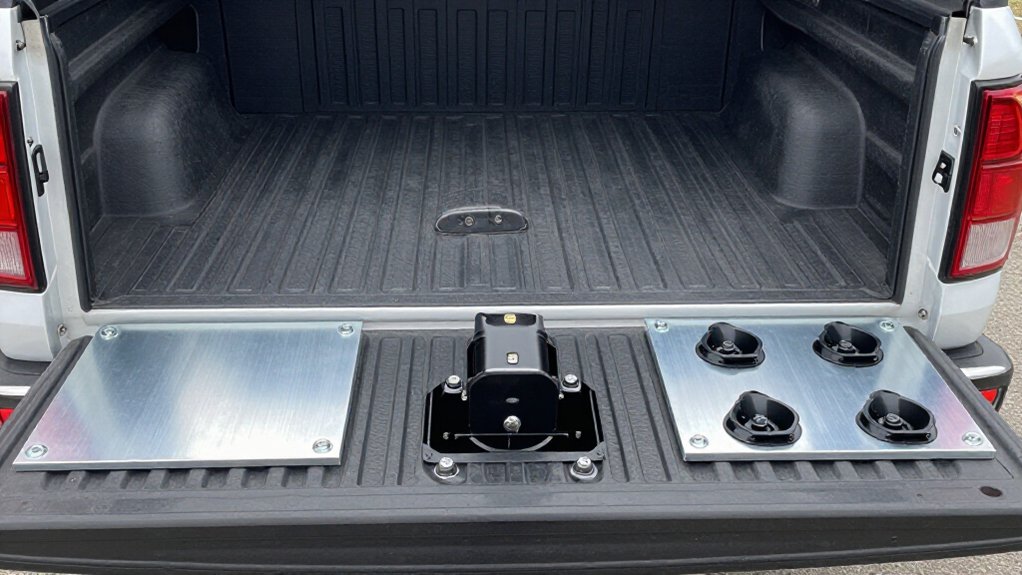
To install a fifth-wheel hitch, choose rails or OEM pucks approved for your truck. Rails require precise bed-rail centering over the axle, specified drilling, and brackets; puck systems use compatible factory mounts for installation.
Chock the truck, verify puck layout, and test-fit connections.
Use sockets and a calibrated torque wrench, following the kit’s sequence and specifications. Check pin engagement and clearances; further setup checks can help confirm safe fitment.
Rails vs. Pucks
If you’re choosing between rails and pucks, consider installation, stability, and how often you need a clear bed.
Rails attach through bed rails and side brackets fastened to truck structure; careful measuring and drilling make DIY installation more involved. Custom above-bed kits may install faster than universal kits, which can require more drilling. Some movement in a rail-mounted hitch may increase chucking, so verify bracket fit and fastener security according to the kit’s instructions.
Puck systems use fixed bed mounting points, letting you remove and reinstall a compatible hitch quickly with a tighter connection. Installation typically uses existing pucks, reducing disruptive bed and frame work. If you often haul lumber, gravel, or pallets, pucks can leave your bed comparatively clear when you’re not towing.
Torque Wrench and Sockets
Once the rails are aligned and the hitch is positioned correctly, tighten the hardware with a calibrated torque wrench to the exact specification in your kit’s instructions; never estimate torque from bolt size alone. Choose sockets that fit your kit’s grade-rated fasteners; mismatched tools can round heads and keep you from applying proper torque.
Follow the manufacturer’s sequence, usually alternating or crisscrossing, to seat rails flat and prevent twist that could affect hitch fit.
- Verify each fastener turns freely before you apply final torque.
- Use the specified socket seated on each bolt head.
- Recheck torque after installing and loading the hitch; repeat after the first few miles if your maker requires it.
- Record values and inspect for gaps or movement before towing.
Step 1: Chock the Truck Safely
With the hitch hardware torqued, secure the truck before any further work: park on level ground, set the parking brake, and place purpose-made chocks firmly against the tire tread on the side opposite your work area, ideally, chock both sides.
Before lowering any jack or crawling beneath the truck to reach mounting points, confirm it stays stationary with a gentle push or rock. Use stable jacks if you’re lifting for access, and chock the wheels both before and after lifting. Keep the chocks seated as you measure, drill, or tighten or loosen hardware; recheck for movement after each operation.
Don’t begin drilling or torquing until the truck remains fully still. Chocks reduce rolling risk but don’t replace a stable lift or careful work practices.
Step 2: Verify Truck-Puck Compatibility
Before buying a fifth-wheel hitch, confirm your truck has the OEM puck system and identify its layout; four-puck and five-puck setups aren’t interchangeable.
Count and locate the bed’s factory puck openings, and check your owner’s manual or truck documentation to distinguish factory puck prep from aftermarket rails. Some layouts serve fifth-wheel applications only; don’t infer compatibility from appearance.
Confirm the hitch’s manufacturer and model are approved for your truck’s year, bed, and puck configuration. For example, a B&W Companion must match the applicable OEM fifth-wheel puck system. Verify the specified claw or fastener hardware and torque values; incorrect parts or tightening can let the base rock under load.
If practical, test-fit the base with the truck unloaded, confirming each attachment engages fully. Follow the hitch instructions for plugs, seals, and connector protection. If you can’t identify the system, ask the truck or hitch manufacturer before purchase or installation.
Step 3: Center Rails Over Axle
After confirming the hitch matches your truck’s puck system, position the base rails on the axle centerline so the kingpin will sit where the trailer geometry requires. Use factory bed dimensions to locate the centerline and confirm the pin box and kingpin position match your trailer’s geometry.
Dry-fit the rails, then measure from both bed sidewalls to verify symmetrical placement; don’t judge by eye. Confirm OEM pucks center over the axle; correct truck preparation if they don’t, rather than forcing the hitch.
Remove or cut a drop-in liner before marking so it won’t shift rail placement. Treat the axle centerline as your primary measurement reference. Before drilling, recheck alignment several times: even a small offset can cause binding, poor coupling alignment, and increased chucking.
Step 4: Bolt Hitch to Rails
Once the rails are centered over the axle, triple-check measurements on both sides, then drill only at the locations specified by the hitch instructions.
Use the supplied hardware to secure the rails and frame brackets, following the kit’s sequence. If your truck has a drop-in bed liner, remove or trim it as instructed so it won’t shift hole positions or prevent proper contact.
Tighten each connection with a torque wrench to the specified value; don’t rely on feel or “snug.”
Before installing the hitch head, confirm the bolted rails sit firmly without rocking. Then set the head onto the rails in the orientation required for your hitch model. Recheck that every latch and connection is fully seated and secured before towing.
Step 5: Verify Kingpin Plate Clearance
Couple the trailer at low speed, then confirm the kingpin plate sits fully in the hitch’s latch area without binding.
Check full plate travel during hookup and release. Inspect clearance at rails, OEM puck top plates, and any stamped or bridge components between mounting points. The plate must not contact these surfaces as it moves.
With the hitch secured, verify torque at rail or puck fasteners against the manufacturer’s specifications, using the specified torque wrench setting. Then repeat the clearance check; tightening can shift alignment.
Check the plate at normal towing height and unloaded or slightly raised, before towing, so suspension settling won’t create interference. In a safe area, test uncoupling and confirm the plate disengages cleanly from the lock jaws without scraping or hanging.
Step 6: Install Hitch Safety Pins
Install the hitch safety pins only after torquing the mounting hardware to the manufacturer’s specifications. Use your hitch manual to confirm each pin’s required orientation and engagement depth; insert and lock every pin exactly as specified. Don’t rely on a pin that’s merely started. Visually verify that each pin is fully seated and locked, using the same checklist you use to confirm jaw closure.
A partially engaged pin may not prevent hitch separation.
Before pinning, give the hitch a controlled check for movement. After pinning, check again. If you detect excessive play, stop and inspect rail or puck seating and mounting bolt torque before towing; pins can’t correct a loose or misaligned interface. Before towing, recheck safety pins and hitch jaw latch points after your first test drive or hitching session to catch settling or an installation mismatch.
Check Tailgate Clearance
Before towing, check tailgate clearance with the hitch and rails or pucks in their final locked position. Open the tailgate fully and confirm it clears the hitch, base rails, and puck hardware throughout its swing. Check at several bed positions, including level and slight flex under a normal load; rail systems may sit differently from OEM puck bases, and forward-corner contact can stop the gate.
With a drop-in liner, test-fit the system and verify puck-to-deck or rail-to-deck alignment after removal or trimming, since a shifted footprint can reduce clearance. For above-bed rails, inspect both rail height and brackets below the bed line. For below-bed rails or OEM pucks, repeat the check after tightening all kit hardware to the specified torque; firm seating can slightly change hitch height. Don’t tow if any component obstructs full opening.
Puck Lock Failure Fixes
If a puck lock won’t fully engage, don’t tow. Remove the hitch and inspect each puck’s claws for bends, debris, or corrosion. Confirm the hitch sits centered over the pucks; slight misalignment can stop rotation even when jaws appear partly closed.
| Check | Action |
|---|---|
| Claws | Clear debris; replace damaged parts per manufacturer guidance. |
| Alignment | Clean puck tops and mating surfaces; reseat and retorque as directed. |
| Hardware | Check free link/pin movement; lower, apply load, and verify locked indicator. |
If it still won’t lock, stop and contact the hitch or kit manufacturer. Provide your truck model and exact puck-system details; replacement or adjustment of locking components may be necessary.
Don’t infer engagement from partly closed jaws: confirm the handle and indicator show locked before towing as specified.
Lubricate Hitch Pivot Points
Identify the hitch’s pivot points in its manual, since lubrication locations vary by brand and model. Check the head-to-kingpin pivot and secondary moving latch surfaces; B&W and Reese/Curt designs may specify different points. Use only the lubricant your manufacturer specifies, commonly a light grease, and apply it sparingly. Excess grease can collect grit, particularly when hauling gravel or lumber.
Afterward, cycle the hitch to distribute lubricant through the bearings and verify smooth movement. Couple and uncouple only if the manual permits and conditions are safe. Recheck grease fittings, bolts, and fasteners for tightness after installation and torqueing; lubrication won’t correct loose hardware or prevent play.
Wipe off excess and keep debris out of pivot areas during hookup, especially when swapping between trailering and hauling.
Conclusion
Choose rails or OEM pucks only after confirming your truck and hitch are compatible; follow the manufacturer’s instructions for torque, placement, and locking. Chock the truck before installation, center rails over the axle, and verify every pin and puck lock engages fully. Before towing, check tailgate clearance, inspect connections, and lubricate pivot points as specified.
If a puck lock won’t seat or release, don’t tow until you’ve identified and corrected the cause. Have a qualified installer verify uncertain fitment or alignment.